Setup Windows 11 VM on Arch Linux
Qemu on its own can be a bit scary but don’t worry this is super easy. If you already have Qemu/KVM setup go to Windows Installation Media. Lets jump straight into it:
Qemu/KVM
Just making sure your system can use the software, then installing it :)
Make sure you update your system first!
KVM
https://wiki.archlinux.org/title/KVM
Kernel-based Virtual Machine (KVM) makes hosting virtual machines super easy.
- Check for processor support:
LC_ALL=C.UTF-8 lscpu | grep Virtualization- Should return
ADM-VorVT-x - If nothing returns, you can’t use KVM.
- Should return
- Check for necessary kernel modules:
zgrep CONFIG_KVM= /proc/config.gz- Should return either
yorm
- Should return either
- Make sure the modules are loaded:
$ lsmod | grep kvm

kvm_intel             245760  0
kvmgt                  28672  0
mdev                   20480  2 kvmgt,vfio_mdev
vfio                   32768  3 kvmgt,vfio_mdev,vfio_iommu_type1
kvm                   737280  2 kvmgt,kvm_intel
irqbypass              16384  1 kvm
libvirt
https://wiki.archlinux.org/title/Libvirt#Client
Just install sudo pacman -S libvirt dnsmasq
dnsmasqwill handle the default NAT/DHCP networking
Qemu
https://wiki.archlinux.org/title/QEMU
I just install qemu-full because I have the disk space for some qemu fluff.
sudo pacman -S qemu-full
If you want a more minimal installation you may want to opt forqemu-desktop instead. Do not use qemu-base, it is headless and will not work with Windows 11.
virt-manager
https://wiki.archlinux.org/title/Virt-manager
Provides a GUI for libvirt
- Install:
sudo pacman -S virt-manager - Start and enable libvirt QEMU connection:
sudo systemctl enable libvirtdsudo systemctl start libvirtd
- Set the default network to start when libvirtd starts
sudo virsh net-autostart default
- Add yourself to the
libvirtuser groupsudo usermod -aG libvirt YOUR_USERNAME
Windows Installation Media
- Download a windows 11 .iso file here: https://www.microsoft.com/en-us/software-download/windows11
- I can’t provide a direct download link here as they die after 24 hours.
- Windows virtio drivers: https://fedorapeople.org/groups/virt/virtio-win/direct-downloads/stable-virtio/virtio-win.iso
- You need these virtio drivers to be loaded in at installation.
We need to emulate a TPM2 chip for Windows 11. Just install these:
sudo pacman -S swtpm swtpm-tools- If you don’t have these virt-manager will tell you TMP2.0 is not available.
Create VM
- Open Virtual Machine manager
- Click the create new virtual machine button
- Top left most icon that looks like a monitor
- Use default “Local install media (ISO image or CDROM)”
- Click forward then Browse… > Browse Local for the
win11.isofile you downloaded.- If not automatically detected search for windows 11 in search box at the bottom of that window and continue.
- This next part depends on the resources you system has available. I just used 8192 MiB and 4 CPUs
- On the next page you create a storage volume for the OS. Make sure to Enable storage for this virtual machine and create a disk image for the virtual machine. I made mine 100 GiB
- Minimum defined by Microsoft is 64 GiB
- On the next page check configure settings before creating
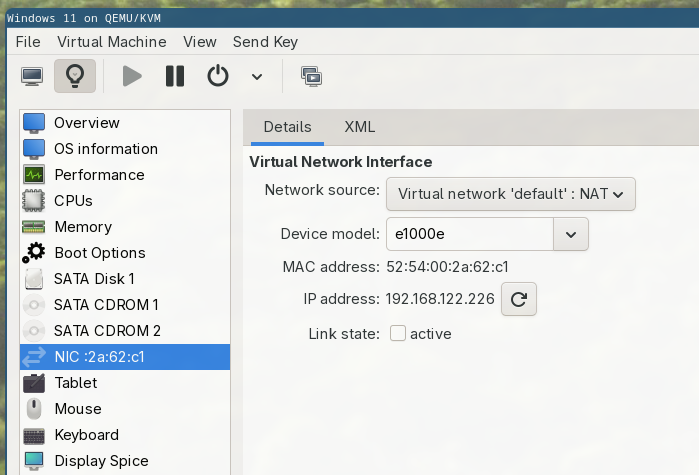
- This will open the settings page. If you already moved on you can select you VM from the list and click Edit > Virtual Machine Details > Light Bulb Icon
- Click Add Hardware and select TPM and within that the Type: Emulated
- Again, click Add Hardware. This time add a storage device (at the top of the list).
- Select the radio button for Select or create custom storage and add the
virtio-win.isofile you downloaded earlier. - Set Device type to CDROM device
- Keep Bus type as SATA.
- Select the radio button for Select or create custom storage and add the
I know that was a bit wordy but that’s it! Just power on the virtual machine and press a key to boot from a drive. You will see this window:
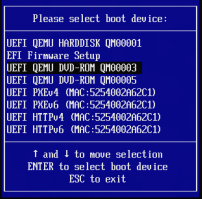
Breakdown of top boot options:
- This is the 100 GiB .qcow storage we allocated earlier. We didn’t install windows yet so it is empty.
- This is the EFI Firmware Setup tool
- This CD-ROM should be our
win11.isoand is what we want to boot to - The 2nd CD-ROM should be the
virtio-win.isoyou added in the previous step.
Select the first CD-ROM option. It will prompt for you to hit enter again - do that quickly or it will bring you back to the boot device selection.
From here it is a typical Windows installation process!
Bonus: Use a local account
We can bypass the Microsoft sign in ‘feature’.
The methods I have used before seem to be patched. So lets just unplug the Network Interface Card. It is virtual just go to the little light bulb icon and turn it off. This works without fail: